How I lime rendered my home

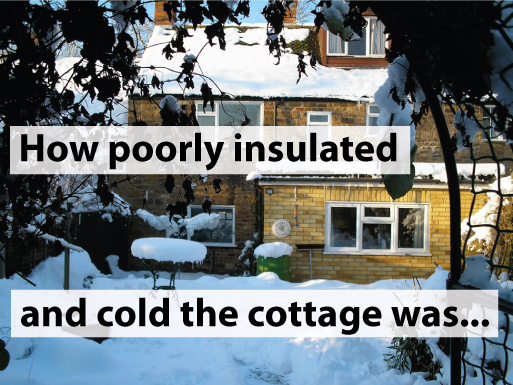
In my last post we learned some amazing facts about lime render, and in this one, we’ll look at how we’ve used it in my house. Much of this would apply to an eco-renovation of any old house.

As we want the walls of the house to be breathable we have used lime plaster. This means moisture can get into the walls, but can also get out again. In my house, the lime render forms part of the airtight layer, in conjunction with the airtight membrane.

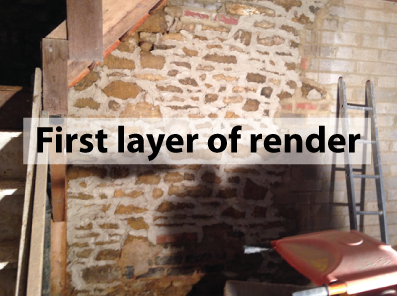
To make render, the lime is applied in thin layers, first filling in gaps between slabs of stone. Each layer has to dry before adding the next, making it a time consuming process. In total, we added three layers. After the electricians have finished wiring, the plasterers come back to add a final layer, which needs to be really smooth.

Before we started the lime rendering, we had a visit from Martin Greenwood, of The Traditional Lime Company, our suppliers. Martin recommended we use hydraulic lime inside the house because it only takes about 3 days to dry unlike ordinary lime render which takes much longer. Hydraulic lime is simply lime with another substance added to speed up the drying process.

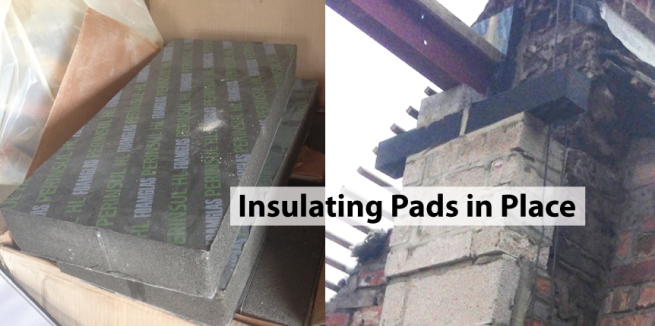
On the inside, we were originally going to lime render only the front, but it made more sense to render the whole of the inside walls to keep everything the same. Over areas of the front wall are patches that had been cemented in the past. Cement isn’t breathable, but the patches are small and we decided it wasn’t worth the effort to take them off, because, overall, they won’t make much difference to the breathability of the walls. Eventually we plan to use Calsitherm insulation over the lime surface at the front. This comes as a rigid board, so the lime needs to be completely flat with no gaps.

As everything is connected to everything else, I had a discussion with the builder and architect about where the lime render will end inside of the house. We decided to render up to the old windows, (which were still there at that time) and if we need to take some off later we can. Removing any excess is easy with an angle grinder.


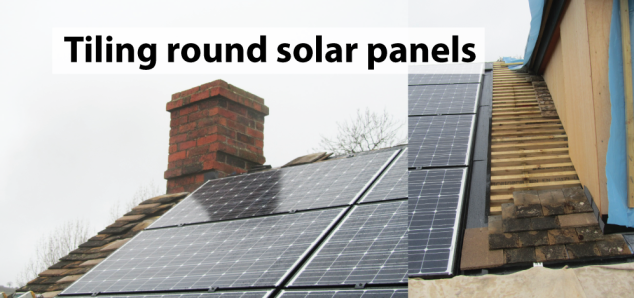
On the outside, we rendered the end gable to reduce the likelihood of rain getting into the building. Because I am having a wood-burning stove, the chimney needs to be insulated on the inside, which meant we didn’t need to insulate the outside too. The outside of the chimney will remain in brick, the same as all the other houses in my street. My house is in a conservation area, and although the rules would have allowed us to change it, I feel happy to think my cottage will remain in keeping with the heritage of the area. My aim with the look of the cottage is for people to not even realise it has been done up!

For the gable end we used lime from the UK, which is pure so takes ages to dry. To speed up the drying time, we added sharp sand into the lime render. You can also use the sand to put a colour into the lime. Render made in this way is dense and therefore slow to take up moisture but also slow to release it.

Things are getting very busy now, so I am going to take a break from blogging for a while and will be back soon with more exciting updates. I’m hoping that it won’t be too long till everything is finished! See you soon.

Amazing facts about lime render

You might be wondering what on earth is lime render?

Believe it or not, lime render is a type of plaster, traditionally used to coat internal walls. Nowadays most internal walls in homes are made of gypsum plaster. If you’ve ever seen inside a house before it has been painted, you will have seen gypsum plaster – it’s an unmistakeable dark pink when it’s put on, and dries lighter.

First, let me tell you something of the fascinating history of lime. Lime render is also sometimes known as lime mortar or lime plaster, and is made from burning limestone. The substance you are left with after burning gets harder with age. The earliest known use of lime in construction is about 4000 B.C., so it has been around for a long time. The Romans used lime in buildings all over their empire. They also invented underfloor heating, which is another thing I am using in this build. So the Romans still have a big influence all these centuries later, and lime render has been thoroughly tried and tested and shown to last a very long time.

Making lime render isn’t simple. It has to be mixed in exact proportions with sand. Lime and sand mortars take time to harden, and don’t harden at all if under water. However, those clever Romans even invented a way of adding other ingredients to make the lime usable underwater, otherwise we wouldn’t have all those amazing aqueducts they made.

Advantages of lime render

So if lime render is tricky to make, why are we going back to using it today? It has several advantages over gypsum plaster.

  • It works extremely well with an airtight membrane. (For my build this is a major advantage, and if you missed my post about the airtight membrane, you catch up here.)
  • It is breathable.
  • Reduces likelihood of damp or mould.
  • Lime render is a more traditional option than gypsum plaster, making it a better choice for an old house.
  • It is long lasting.
  • It can be used on the inside of a building (in place of gypsum plaster) or on the outside (for example instead of concrete.)
  • Easily recycled.

Advantages of using lime render with an airtight membrane

Let’s take a closer look at that first advantage – at why lime render and an airtight membrane work so well together.

It might seem bizarre to use a product that is breathable along with one which is airtight, but this isn’t as contradictory as it seems. In his article A Guide to Airtightness, eco expert Tim Pullen explains that breathability is not primarily to do with air. Airtightness means that there is minimal leakage of cold or hot air into or out of the house through cracks in the building materials, gaps between joins or where different materials meet – for example around windows or doors. As Pullen explains, UK airtightness regulations are fairly lax, and renovating to eco standards means going way beyond those standards.

Breathability, on the other hand, simply means the walls of a house take in moisture, but will also release it so that it dries out again. A building material with the ability to release any water vapour is called “hydroscopic.” When creating an airtight building it is essential to have breathable walls, otherwise you’d have a very damp house. Breathable walls reduce the growth of mould and dust mites, both of which contribute to allergies.

Years ago, before we had cement, all buildings would have been breathable and would have been plastered on the inside with lime render. In the UK everyone changed to using cement as it was much easier to use. However, lime is very recyclable. Old lime that has fallen off a wall can be used again as aggregate and mixed in with new lime. Old cement can also be recycled, but at a greater cost.

How the lime render and airtight membrane work together in our build

Lime render also acts as an airtight barrier itself. For our build, in areas of the house where there is lime render, such as on the inside of all the external walls, we can smooth the render over the edges of the airtight membrane. Together this forms a continuous airtight barrier. To attach the airtight membrane to the plaster successfully, we have to use a tape fastened to the edge of the membrane, which has a mesh on it. The mesh is what gives some grip and makes sure the join is secure. The lime plaster will then form part of the continuous airtight lining to the house.

As you might imagine, this is a complex process that required quite a bit of planning, preparation and care, and that needs a post in itself! Stay tuned for the next exciting instalment of how we used secret strategies to improve the breathability of my home!


The year in my Cotswold Village


It’s been an eventful year here in the Cotswolds, with several twists and turns both in UK as a whole, and in my little part of it. Life rarely goes exactly as we plan and that’s certainly been the case with my eco-build.

However, while there have been frustrations and delays, there have also been magical moments, excitement and progress. I wrote about one of those magical moments in Fitting Solar Panels to a New Roof. (That moment actually happened at the tail end of 2015, but since I relived it in post in 2016 – it counts!)

Whatever you are doing, sometimes it’s good just to take time out just to appreciate the world around you. A couple of days ago I was awed by a sudden mist that came creeping into the village.

I’ve also been awed by the positive response to this blog. When we launched back in the summer, with our Welcome post, I had almost no idea about blogging –I’ve learned such a lot in that time!

I also had no idea what to expect and I’ve felt so touched by some of the feedback we’ve received, with people calling it, “an amazing project,” and, “ambitious.”

It stops me in my tracks to hear those things – I’ve grown so used to this project, I forget how unusual it is. Not everyone is busy making their house into an eco-home!

If you have ever wondered How to Prepare for an Eco-Renovation then you are not alone, because that is my most popular post! If you haven’t read it already, do check it out. After that I suggest First Steps of an Eco Renovation it’s my favourite post! Why? Because it was so very exciting to start! Seeing the behind the scenes guts of my house, and how different it looked. Then seeing the builders begin to put it back together again.

What’s in store for 2017?

First off we will be lime rendering the whole inside of the house. If you have no idea what lime render is, don’t worry! Nor did I a couple of years ago, and now I’m (almost) an expert. Or at least, I know enough to explain to you why it’s so important!

There will also be all sorts of other exciting things happening – including eventually finishing the renovation. But there’s a while to go yet, so do come with me on the journey!

The Ugly Truth About Rotten Floors


edge-of-floorboards
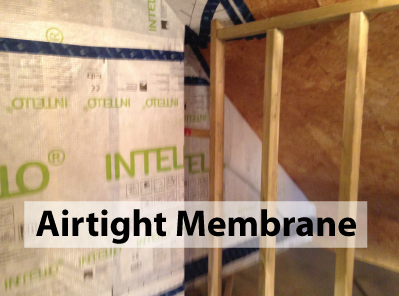
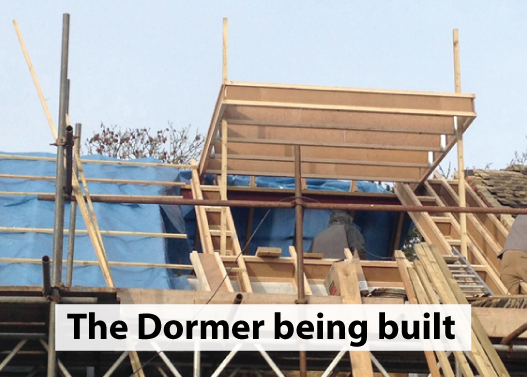
Last time I wrote about how to build a dormer window on an eco-roof. In this post I focus on the inside of the eco-roof, in particular on the airtight membrane that makes the house practically airtight.

As mentioned in Unexpected complications when rebuilding an old house, the entire inside of the house will be lined with sheeting which forms an airtight layer. This sheeting (or membrane) runs continuously around the inside of the building and has to have no gaps, so builders use a special tape to seal up any joins.

airtight-membrane

To add this membrane to the inside of the roof, we first boarded over the underside of the Steico beams with OSB ( which mean oriented strand board) and then laid the airtight membrane over that. We fitted this over most of the inside of the roof in the attic room, leaving some areas for adding blown-in insulation, which is a job for later. The company doing the blown-in insulation need to make holes to insert the insulation so it makes sense to leave gaps in the membrane layer for this! However, we did need to put the membrane in areas where the builders needed add the battens that would form the skeleton attic bedroom wall, which you can see in this photo. The rest will be finished off after the insulating the roof.

airtightand-battening

On the day the builders were to start fitting the airtight membrane, I went over to the site. I expected to find them tucking the membrane down to the ground floor. Instead, I was surprised to find them pulling up floorboards on the middle floor. I had known that they needed to remove the floorboards around the edges of the building to do the tucking down. What I didn’t realise, and nor did they at first, was that the whole floor was rotten with woodworm. On the surface the floorboards looked fine, and it was only when the builders started to take them up that they saw the boards were riddled with woodworm. The boards broke easily, and would eventually have crumbled. They couldn’t stay.

edge-of-floorboards-landacape

This was an expense I hadn’t budgeted for.

rotten-floorboards

However, had we finished the whole house and then discovered the floorboards on the first floor were rotten, it would have been far more trouble and expense than now. So, overall, I feel relieved this came to light early on.

Because the building will be almost airtight, we will have a mechanical ventilation and heat recovery unit (MVHR.) This will provide fresh air from outside, but will save any heat left in the air, putting it back into the building. You really need this unit if your building is airtight, otherwise the building will seem stuffy and airless.

condensation

Additionally, people give off a lot of moisture, from our bodies and in our activities such as washing ourselves, drying clothes, and cooking. An MVHR unit removes that moisture. You may have noticed that in some buildings, there is a build up of condensation on the windows. This used to happen in my cottage before I moved out to do the work. Every morning in colder weather, I would mop icy water out of the windowsills, a nightmare job! The MVHR unit will put an end to this. I am really looking forward to having condensation-free mornings when I move back in.

In the next post, I shall tell you lime render (where does it go?) This is fiddly, long-winded job that caused a lot of drama for us.


Dormer Window on an Eco House

roof-before

When I bought the cottage, it already had an attic room with a dormer window. I loved this room when I first saw it, and it was partly what made me buy the house. However, it had turned out to be extremely cold in winter, so unusable as the studio I had dreamed of. It was also too cold to use as a guest room during the winter months.

Fortunately, since improving insulation is a main priority of the renovation, this room will be usable all year round when everything is completed.

dormer-window-brfore

What a Dormer Window is

In case you aren’t familiar with the term – a dormer is a window that projects out from a sloping roof (see photo above.) In an attic room, the walls slope, giving less space at full height than at floor level and having a dormer makes the room more spacious. It also means you have a view, which you often don’t with a skylight or other roof window, and gives the room a lighter, more airy feel.

For all of these reasons, I was keen to keep the dormer. As we went through the process of obtaining planning permission, we learned the cottage is in a conservation area and an area of natural beauty, so planning regulations are more stricter than in some areas. The new dormer would have to be the same as before.

starting-making-a-dormer-window

Dormer windows – comparing new Eco with old and leaky

As we’ve already seen in previous posts, the quality of the roof is hugely important in an eco-renovation. Compared to an ordinary roof, an eco-roof is more complex in construction. To be properly insulated, the whole roof (Photo of before) had to come off. This wasn’t a big deal because it was old and needed to be replaced anyway.

As was standard at the time, the original dormer window and roof were constructed in a different way to the new one. They were made of single rafters that acted as the load bearing part of the construction. This layer was covered in a weatherproof outer layer, with plasterboard in the inside. Nowadays, in the UK, building regulations do require more insulation, so some sort of insulation would be used in the void. However, the walls and ceiling of the dormer wouldn’t be as thick because they would not use as much insulation as we used.

the-dormer-being-built

In contrast, we made our whole construction out of I beams leaving lots of space for the insulation. This is a more time consuming operation, but is much more effective at maintaining an even temperature in the house during winter and summer.

A complex construction

The construction of the dormer window needed a lot of care. It has to be strong, because it is part of the structure of the roof: how the Steico beams intersect is crucial, as we need to fill the gaps, with small bits of wood (as shown in the photograph). We also need to make sure it’s possible to get the blown-in insulation in to all the awkward corners, such as where the main roof meets the dormer construction at an angle. This is the main insulation layer for the roof, so it is important to get right.

Because it had to be integrated into the roof, the construction of the dormer happened in stages. As first the builders created the structure, and then covered it with plastic while they fitted the solar panels. When these were in place, they finished it off.

a-new-dormer

What to do about the sides of the Dormer

The sides, or cheeks as the builder keeps calling them, of the dormer are covered in lead sheeting. This is expensive, but while tiling with spare roof tiles would cost nothing on materials, labour would be a big cost, because would be fiddly to do. Over the lead is a rubberized roof, which isn’t completely flat so that the rain can run off either sides and down into the gutters.

On the underside of the roof, the builders will eventually fit an insect mesh. This will prevent insects getting into parts of the roof and causing a problem. Insects have loads of places to go in the garden, so it’s not as mean as it sounds.

Although a dormer might seem complicated, and is more expensive that just having a plain roof, it is definitely worth it. Because of the rubberized roof and lead cheeks it won’t leak, and its strong construction means it will last for many years.

Next time we will look at more work on the inside of the house, and the airtight layer. Do let me know what you think so far, I do love to hear what you think, so please make comments.

See you soon.


Fitting Solar Panels on a New Roof

finishing-tiling-round-solar-panels

 I was excited to be at the stage of putting tiles on the roof. Not only did this mean the building looked like a house again, but it also meant we were a step nearer to attaching the photovoltaic panels, which was what I was especially looking forward to!

I hadn’t been sure about these, and had planned on having both thermal solar panels and photovoltaic panels. However, the architect pointed out that with just me living in the house this would not be cost effective. Thermal solar panels consist mainly of thin plastic pipes filled with water. The water heats up when the sun shines on the panels. In the summer, I would have far more hot water than I could use, a real waste.

Thermal solar or photovoltaic panels – what’s the difference?

Solar thermal panels are much cheaper than photovoltaic ones because they are much simpler. Some people even build their own panels. On the other hand, although photovoltaic panels are more expensive, their design is more complex and they produce electricity rather than heating water. In the UK, when electricity is produced, it is firstly used by the household. Any surplus goes to the grid and you get paid for that. Depending on your household needs, either type of panel might suit you better. If you use a lot of hot water, the cheaper thermal panels might suit you, but if, like me, your water usage is minimal, then photovoltaics are the panels for you.

Fitting solar panels to a roof

If you add solar panels to an existing roof, they sit on top of it, with a gap between roof and panels. However, because we were rebuilding the roof, we were able to integrate them more. This integration means the photovoltaic panels sit on rigid plastic sheets and are almost flush with the roof, which has two benefits: they look better than if placed on top of a tiled roof and they are not susceptible to high winds. Any rainwater that runs down the roof goes between the panels and the sheets, making them hardy in all weathers.

gutex-boards-on-main-roof

Before all this happened, we had a few more steps after screwing on the Gutex Boards (which happened in the last post.) First, the builders taped round the edges of the Gutex boards. Then on top, they laid a thin sheet of breathable water and windtight membrane. On top of that went the battening. Battens are thin strips of wood nailed across the roof. The builders then nailed the tiles onto these.

breathable-membrane

Apart from the dormer, for which the builders constructed a basic shell at the same time as they created the structure for the roof, that completes the outside of the roof. At this time, the dormer was covered in plastic sheeting until it could be finished. There was also work to do inside, putting in the insulation for the roof.

the-basic-shell-of-the-dormer

I’ll write more about both of these in later posts, but for now our focus was on preparing the roof for the photovoltaic solar panels. The builders concentrated on tiling the back of the roof, since that was where the panels were going. The architect had worked out the exact position and size for the panels so the builders tiled around the edges of the roof, leaving spaces for the panels.

tiling-round-solar-panels

Ikarus Ltd, the solar panel company, delivered the panels to the site, and then a couple of days later, the big day came. It was time to fit the panels. When I went to the site, it was buzzing with people. As well as my builders, there were people from Ikarus Ltd. Their fitters were on the roof, getting the solar panels in place. First, into those spaces the builders left, they fitted rigid plastic sheets that the photovoltaic panels fit into. Then they attached the solar panels.

An exciting day, fitting the solar panels

It was a lovely, clear winter’s day, shortly after Christmas, and I brought mince pies for everyone. When we stopped to eat the pies and drink tea, I chatted with the people from Ikarus. They spoke about other jobs they were doing, creating solar farms. I felt fortunate to have them fitting in my little job around their vast projects. I felt so optimistic on what seemed like a momentous occasion. Everything seemed more complete, and I could imagine moving back into my house in the near future. Little did I realise that day, there was still a very long way to go.

we-have-solar-panels

Eco-Roof Layers – What Goes Into an Eco-Roof

steico-beams-finished

In the last post, we figured out the correct height and angle for the new roof, in preparation for the roof beams. This post explains more about the many layers in an eco-roof, as well as more problems we encountered.

These Steico beams aren’t easy to fit at all. After discussions with the architect it took ages for the builders to measure and discuss fixings, and then measure again. This has to be exact. There is a lot of thinking ahead on this build. The placing of the fixings are crucial – it is astonishing how much power there is in a gust of wind, and a gust of wind could take the roof off if we get it wrong.

These beams will eventually form the area for the warmcell insulation to be blown into. They will also be the main structure of the roof that everything else will fit around. This means the roof is taking ages to make, requiring a lot attention to detail. All the Stecco Beams have to have the gaps where they intersect filled in with small bits of wood.

beams-forming-space-for-insulation

Coping with bad weather during a build

We ran into a patch of bad weather. It rained on and off for days just when the builders were working outside and the roof was off. They tried to keep going with building the new eco-roof, but driving rain made it impossible. It was so frustrating to see everything have to stop again and my house with no roof, eco or otherwise, but instead covered in plastic sheeting while we waited for the weather to improve.

In middle of all this, the Gutex boards arrived. These are an important layer in the eco-roof. They are made of woodfibre, and were going to be screwed onto the Stecco beams over the whole of the roof. I was worried the rain would make the wood fibre damp and ruin it. However, they had been treated, so were fine to be left exposed for up to 3 months. In the end, the boards were only out in the open for about three weeks because the builders managed to work in between bouts of rain. Their commitment meant there was plenty of time to get the boards screwed onto the roof and covered over.

gutex-boards-arrived

Importance of Gutex Boards

The Gutex boards form the outer layer of insulation for the roof. They are flat solid boards made of wood fibre, and dovetail together all round the sides with tongue and grove joints. This means that if you push them close together when nailing them to the roof the join will be almost airtight. Having said that, we still needed to tape up all the joins with special tape, to make sure we didn’t have any gaps at all. But before that, the sheets of Gutex are screwed together with special screws, much longer than normal screws. There are two lots of fixings: one sort goes in at an angle of 60 degrees and the second at an angle of 90 degrees.

screws

You need a good builder for an eco-roof renovation!

I go to meetings with the builders to sort out these things, and am amazed how complicated and detailed this is. I am so pleased that the builders know what is going on! They are all so interested and committed to making it work – which is exactly what you need on a build of this sort.

We are using a variety of special tapes in different parts of this build, to tape up different types of materials. It is very important to do this properly when building an eco-roof: the more attention to detail the more airtight your building will be. With an old building, you have a built-in disadvantage – you have to deal with what is already there. More often than not (as we have found) this is not straightforward and surprises appear when you strip out the building. If this was a new build it would be far more straightforward!

That’s it for today. I hope you enjoyed this post and next time I will tell you about tiling the roof and adding solar panels – a really exciting step. Be sure to come back and join me on the next post.


Putting I Beams In Place For A New Roof

old-roof

At the end of my last post the builders had taken the old roof off and saved the tiles, which was a straightforward job. This changed the appearance of the house in a very dramatic way. There has been so much discussion leading up to it I thought it would never happen! But as with everything on this build, I would rather they go slowly and get it right than rush it.

tiles-taken-off

The first job was to place two new metal Rolled Steel Joists (RSJs) across the top of the roof horizontally. This will form the basis of the roof, the position of all the Stecio joists will be determined by these RSJs. They do have to be insulated to prevent cold bridging, so are sitting on special insulating pads at either end of the building. I mentioned cold bridging in The Main Start of the Eco Build – Unbuilding and Ripping Down. As you can see, concrete blocks hold these RSJs in place. Each RSJ was bolted to the central metal pole.

special-insulating-pads

The height of the attic floor had to be measured before anything was done, to make sure that the finished attic floor will be just below the base of the central vertical pole, and that the roof will be at the right height. This pole holds up the two middle ends of the RSJs.

rsjs-bolted-to-metal-pole

We are going to raise the height of the roof by about 240mm to allow for timber Steico I beams. Then insulation will be put in between the I beams, exactly the same process as we will use on the back wall of the living room.

steico-roof-beams

Timber Steico I beams are made up of natural fibreboard, which forms the upright bit of the I, and the oblong ends are made of LVL (laminated veneer lumber). This is formed of multiple layers of thin wood with adhesive in between the layers, it is a very robust material and doesn’t warp, or twist like wood can.

i-beams-on-roof-at-an-angle

I beams are very eco: they use about a third of the amount of timber than if these beams were made of just ordinary wood. The joists are FSC certified (Forest Stewardship Council.) This organisation was established to promote responsible management of the world’s forests.

intersection-of-i-beams

The I beams will run up the roof at an angle. Fitting these beams is an art in itself. They meet at all sorts of angles and have to have bits of wood to fill the gaps where they don’t quite meet, so all quite fiddly.

The architect needs to tell the builders exactly where to place each I beam, so that the fixings can be put at the correct intervals. This is important, as the big sheets of fibre board, called Gutex boards, that are going on top of the roof can be vulnerable to suction, when there are strong gusts of wind. So the fixings have to be exactly right so that I don’t lose the roof in strong winds!

gutex-boards-delivered

As you can tell, quite a lot is going on at the moment, and after all that working out where straight is, in the last post, we now have the main structure of the roof marked out in Steico beams. Now we can get on with the rest of the roof phew!


Unexpected complications when rebuilding an old house

Ripping-my-house-apart,-big-time!

Having done the ripping down and strengthening up of the building by putting in metal beams, we arrived at the stage of taking off the main roof.

New-Joists-for-Attic-Bedroom

Lots happens at once during an eco-renovation

The builders took all the tiles off the main roof, and stored them in the front garden as they will go back onto the new roof. Whilst this was going on there was another team putting in the new joists for the attic bedroom floor, the old ones having been totally removed. You can see in this photo that there is a bit of plastic sheeting poking out over the tops of the walls. This is the start of the airtight layer that will eventually line the whole of the inside of the house. It will be continuous, with the sheets joined by a special tape that makes it completely airtight so no cold can get inside.

Plastic-airtight-sheeting

Working out what straight is!

One issue that came up was the front wall of the cottage, which isn’t straight at all. Sandy, the architect, had a meeting with the builder to decide where straight is, as far as putting the roof back on goes. They looked at the plan in the photo below and decided where straight would be. This was quite a complicated task because they had to follow the roofline of the neighbouring house and to take into account the line of the back wall. At one point, it looked as if the pitch of the roof might have to be at a different angle at the back from at the front. In the end, they were able to make the straight line though back wall parallel to the straight line at the front and so the pitch is even.

This-is-straight

Sandy took a line which is going to be the straight roof line, and where the wall bends in, the eaves of the house will overhang a bit more at one side. There has to be something covering the insulation etc when you look up at the underneath of the overhang, every detail from every angle has to be thought of. But it’s all a bit wonky, it’s an old house after all!

Fairly-straight-back-wall

Luckily the back wall is fairly straight. Having said that, it might be straight horizontally but it is uneven vertically, which caused some challenges you can read about in The Main Start of the Eco Build – Unbuilding and Ripping Down.

An old man who used to live in the village told me that he could remember when the house used to be one storey, and the people who owned it took off the original thatched roof and made the walls higher. The walls of the original cottage have two layers – an inner and outer shell. When the new wall was added, it was only one layer thick, and surprisingly it was the inner layer they extended! This creates a shelf on the outside where the two walls meet. The shelf was of mortar and open to the elements. Because mortar is porous, water could seep in.

A-Thatched-Cottage

Between the layers, the original builders put rubble and waste building material, some as fine as dust. Over the years, this settled, but with the porous shelf this settling increased, since rainwater soaked through and washed it down. This meant much of the wall had no insulation and it was no wonder I was so cold during winter. It also meant that when the Society for the Protection of Ancient Buildings (SPAB) came to check the cottage for damp, they found it – but in an unusual place. It was very damp just below the shelf, so water had seeped in. The dampest place on an old wall is normally close to the ground where water gathers, and this can soak up the wall.

Roof-off

To protect the cottage from further seepage, the simplest solution is to make the shelf watertight, most likely by fully covering it with a sheet of lead. This lead covering is a job for later on in the build, and meanwhile the builders took the old roof off, saved the tiles and started work on creating the new roof. You can read all about that in my next post.

The Main Start of the Eco Build – Unbuilding and Ripping Down

The-Back-Wall-rebuild

Moving out to Eco up my home

I thought moving out and having to rent was scary, but now people were ripping my house apart, big time! It was strange to see plaster coming off the walls of somewhere you’d once called home, and the whole place stripped down to outside walls.

All non stone walls have been taken out. The floor to the attic is gone and I am left with a large tall space, in the middle of which is a steel post going right up to the roof, and holding up the two horizontal RSJs (rolled steel joists) that have been put just inside the old roof and will eventually hold up the new one.

Floor-to-the-attic-gone

Issues we hadn’t anticipated

Then there was an issue we hadn’t anticipated: a huge stone was right under the front door, sticking out into the room. We have left this for the time being; it will eventually have to be cut with an angle grinder to give an even shaped wall. If we leave it as it is and put the floor insulation round it, cold from outside the house will be transferred to the inside: this is called cold bridging. Sandy, the architect, had to work out how to prevent cold bridging around the ends of all the steel beams throughout the house. There needed to be something between them and the outside walls of the cottage.

Close-Front-doors

Dealing with the unknown

One of the challenges when dealing with an old building is that you don’t know what alterations were done in the past. You can find all sorts of horrors behind plaster and under floorboards. For example, we can’t tell how far the stone under the door goes under the front wall of the house. So caution will be needed in cutting it out, especially because it is very near to the adjoining neighbour. I don’t want to upset them! We did discuss removing it altogether, but it would be a very big job. 

Stone-Under-Front-Door

Talking of horrors, the fireplace had been blocked up when I moved into the house, and was unblocked by the builders. Inside, they found a grizzly pile of dead crows that over the years had fallen down the chimney, not able to get out again. I do remember hearing birds from the fireplace, but thought that it was the echo of them sitting at the top of the chimney. To prevent this happening again, I am considering a couple of options: wire mesh across the chimney pot or a cowl. Both have pros and cons, and my builder will advise me which is most suitable for my cottage.

Poor-quality-crumbling-stonework

And another unanticipated issue

Another thing we hadn’t anticipated was the poor quality crumbling stonework around the living room window at the back of the house. The walls are very thick, and have an inner and outer layer. The outer wall was bowing out, which created a problem. Outside the back wall, we are going to build a wooden frame. We will nail plywood to this frame and seal the sides, joining it to the building. In the 250mm depth cavity this creates, we will put Warmcel Blown-in insulation, which is made of recycled newspaper. Because the back wall was bowing out, it would have meant the layer of insulation would be too thin, and not provide enough protection. We had to remove the outer stone face of the wall completely and rebuild it, creating another unexpected expense.

Wall-removed-under-window-sitting-room

Another Unexpected Expense

The whole of the wall below the window was removed, and it is not necessary to rebuild it so thick because the insulation is so good. The wall will just be there to hold the insulation in place. This gives scope for a recess, where I could have a beautiful window seat to relax and enjoy the sun. So sometimes even when things seem like set-backs and problems, they can turn out to be blessings in disguise.