Amazing facts about lime render

You might be wondering what on earth is lime render?

Believe it or not, lime render is a type of plaster, traditionally used to coat internal walls. Nowadays most internal walls in homes are made of gypsum plaster. If you’ve ever seen inside a house before it has been painted, you will have seen gypsum plaster – it’s an unmistakeable dark pink when it’s put on, and dries lighter.

First, let me tell you something of the fascinating history of lime. Lime render is also sometimes known as lime mortar or lime plaster, and is made from burning limestone. The substance you are left with after burning gets harder with age. The earliest known use of lime in construction is about 4000 B.C., so it has been around for a long time. The Romans used lime in buildings all over their empire. They also invented underfloor heating, which is another thing I am using in this build. So the Romans still have a big influence all these centuries later, and lime render has been thoroughly tried and tested and shown to last a very long time.

Making lime render isn’t simple. It has to be mixed in exact proportions with sand. Lime and sand mortars take time to harden, and don’t harden at all if under water. However, those clever Romans even invented a way of adding other ingredients to make the lime usable underwater, otherwise we wouldn’t have all those amazing aqueducts they made.

Advantages of lime render

So if lime render is tricky to make, why are we going back to using it today? It has several advantages over gypsum plaster.

  • It works extremely well with an airtight membrane. (For my build this is a major advantage, and if you missed my post about the airtight membrane, you catch up here.)
  • It is breathable.
  • Reduces likelihood of damp or mould.
  • Lime render is a more traditional option than gypsum plaster, making it a better choice for an old house.
  • It is long lasting.
  • It can be used on the inside of a building (in place of gypsum plaster) or on the outside (for example instead of concrete.)
  • Easily recycled.

Advantages of using lime render with an airtight membrane

Let’s take a closer look at that first advantage – at why lime render and an airtight membrane work so well together.

It might seem bizarre to use a product that is breathable along with one which is airtight, but this isn’t as contradictory as it seems. In his article A Guide to Airtightness, eco expert Tim Pullen explains that breathability is not primarily to do with air. Airtightness means that there is minimal leakage of cold or hot air into or out of the house through cracks in the building materials, gaps between joins or where different materials meet – for example around windows or doors. As Pullen explains, UK airtightness regulations are fairly lax, and renovating to eco standards means going way beyond those standards.

Breathability, on the other hand, simply means the walls of a house take in moisture, but will also release it so that it dries out again. A building material with the ability to release any water vapour is called “hydroscopic.” When creating an airtight building it is essential to have breathable walls, otherwise you’d have a very damp house. Breathable walls reduce the growth of mould and dust mites, both of which contribute to allergies.

Years ago, before we had cement, all buildings would have been breathable and would have been plastered on the inside with lime render. In the UK everyone changed to using cement as it was much easier to use. However, lime is very recyclable. Old lime that has fallen off a wall can be used again as aggregate and mixed in with new lime. Old cement can also be recycled, but at a greater cost.

How the lime render and airtight membrane work together in our build

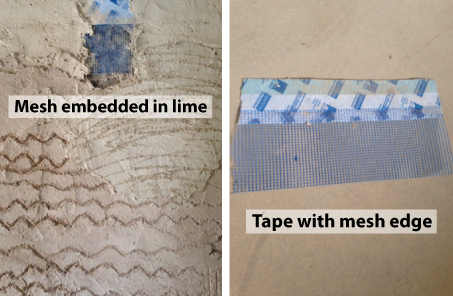
Lime render also acts as an airtight barrier itself. For our build, in areas of the house where there is lime render, such as on the inside of all the external walls, we can smooth the render over the edges of the airtight membrane. Together this forms a continuous airtight barrier. To attach the airtight membrane to the plaster successfully, we have to use a tape fastened to the edge of the membrane, which has a mesh on it. The mesh is what gives some grip and makes sure the join is secure. The lime plaster will then form part of the continuous airtight lining to the house.

As you might imagine, this is a complex process that required quite a bit of planning, preparation and care, and that needs a post in itself! Stay tuned for the next exciting instalment of how we used secret strategies to improve the breathability of my home!


Unexpected complications when rebuilding an old house

Ripping-my-house-apart,-big-time!

Having done the ripping down and strengthening up of the building by putting in metal beams, we arrived at the stage of taking off the main roof.

New-Joists-for-Attic-Bedroom

Lots happens at once during an eco-renovation

The builders took all the tiles off the main roof, and stored them in the front garden as they will go back onto the new roof. Whilst this was going on there was another team putting in the new joists for the attic bedroom floor, the old ones having been totally removed. You can see in this photo that there is a bit of plastic sheeting poking out over the tops of the walls. This is the start of the airtight layer that will eventually line the whole of the inside of the house. It will be continuous, with the sheets joined by a special tape that makes it completely airtight so no cold can get inside.

Plastic-airtight-sheeting

Working out what straight is!

One issue that came up was the front wall of the cottage, which isn’t straight at all. Sandy, the architect, had a meeting with the builder to decide where straight is, as far as putting the roof back on goes. They looked at the plan in the photo below and decided where straight would be. This was quite a complicated task because they had to follow the roofline of the neighbouring house and to take into account the line of the back wall. At one point, it looked as if the pitch of the roof might have to be at a different angle at the back from at the front. In the end, they were able to make the straight line though back wall parallel to the straight line at the front and so the pitch is even.

This-is-straight

Sandy took a line which is going to be the straight roof line, and where the wall bends in, the eaves of the house will overhang a bit more at one side. There has to be something covering the insulation etc when you look up at the underneath of the overhang, every detail from every angle has to be thought of. But it’s all a bit wonky, it’s an old house after all!

Fairly-straight-back-wall

Luckily the back wall is fairly straight. Having said that, it might be straight horizontally but it is uneven vertically, which caused some challenges you can read about in The Main Start of the Eco Build – Unbuilding and Ripping Down.

An old man who used to live in the village told me that he could remember when the house used to be one storey, and the people who owned it took off the original thatched roof and made the walls higher. The walls of the original cottage have two layers – an inner and outer shell. When the new wall was added, it was only one layer thick, and surprisingly it was the inner layer they extended! This creates a shelf on the outside where the two walls meet. The shelf was of mortar and open to the elements. Because mortar is porous, water could seep in.

A-Thatched-Cottage

Between the layers, the original builders put rubble and waste building material, some as fine as dust. Over the years, this settled, but with the porous shelf this settling increased, since rainwater soaked through and washed it down. This meant much of the wall had no insulation and it was no wonder I was so cold during winter. It also meant that when the Society for the Protection of Ancient Buildings (SPAB) came to check the cottage for damp, they found it – but in an unusual place. It was very damp just below the shelf, so water had seeped in. The dampest place on an old wall is normally close to the ground where water gathers, and this can soak up the wall.

Roof-off

To protect the cottage from further seepage, the simplest solution is to make the shelf watertight, most likely by fully covering it with a sheet of lead. This lead covering is a job for later on in the build, and meanwhile the builders took the old roof off, saved the tiles and started work on creating the new roof. You can read all about that in my next post.

First Steps of an Eco Renovation

First steps of eco renovation

Eco-Renovation-1st-Steps

In the previous post, I looked at essential preparation before embarking on an eco renovation. Once we had a plan, we were ready to start the eco renovation itself. This was exciting and scary! It was a huge undertaking, and it didn’t take long to realise that we needed flexibility in our plans, altering as necessary.

I initially intended to continue living in my house during the renovation, thinking I could just squash into one corner. However, the builder and the architect thought I should move into a rented home for the 6 to 8 months they estimated it would take to do the build.

The builders had to take plaster off some walls, and take a lot of the house apart, to know what was happening behind the scenes before they could finalise the details of the plan. This project was growing, taking on a life of its own. For instance, to accommodate under-floor heating the builders needed to dig up all the lower floors. Squashing in a corner was impossible.

Dug out floor

Budget for unexpected expenses

So now, as well as the build, I needed to budget for rent, removal, and storage of a lot of my belongings. I searched the local papers and online for somewhere to stay, and visited various prospective homes. Ideally, I wanted somewhere in the same village as the cottage. Nothing suitable come up, but an apartment turned up in a nearby town. It’s a bit of a drive to my building site, but I can retreat to peace and quiet when it gets hectic. I stored much of my furniture with my trusty removers, Cotswold Carriers, so that I only needed to rent a small cheap place.

RSJs-ALL

With me out of the way, the builders got to work pulling down bits of my house. One of the first things they needed to do was strengthen the building with rolled steel joists (RSJs.) These beams provide a lot of strength to the first floor of the house and help strengthen the whole building. Putting them in place was a major job in itself. Holes had to be made for two RSJs to go across the house from one side through the middle wall (which was still standing) and into the wall on the opposite side.

The builders told me that they would have to make pads for the RSJs to sit on in the wall. These provide insulation, and without them, cold would come in through the ends of joists from the outside walls. When I heard about these pads, I imagined something soft like a mattress, but they turned out to be made of a special insulating bricks. Not as soft as they sounded!

Insulating-Pads

Once we’d started dismantling the house, we realised that the floor to the attic needed to go. It would also be a good idea to lower the first floor ceilings, to give more height in the attic bedroom.

As there was a couple of inches (5 cm) difference in floor level between the two halves of my cottage, (it used to be two cottages.) The builders were able to even this up, so the whole of the first floor would be one level. They dug out the ground floor by two feet (60 cm), leaving space for the insulation and under floor heating to go in.

At this point some old plaster remained on some of the walls. As we discussed various options of insulation for beneath the under floor heating, Sandy, the architect sketched these out on the walls! It seemed a good use of the plaster and made it easier for me to understand the different levels of the floor.

Writing on wall

Be flexible with your renovation plan

So, as you can see, the process of starting the eco-renovation of an old house requires a plan. However, there is also a need for re-assessing and “thinking on your feet” as you get down to details.

The builders then discovered that there were no lintels or joists across the top of the windows, and they were amazed that the windows hadn’t collapsed. As it was, rotting window frames were all that held them up. Before the builders took out the old windows, they had to prop them up with Acro props (metal props) and put in concrete lintels to hold up the walls. Otherwise, when they took the windows out, the building would have collapsed.

Because the walls were so thick, it took two (and in some cases three) lintels side by side along the depth of the wall to hold the weight of the stonework above.

Lintels over windows

I went into this aware that building work always takes longer and costs more than expected. However I hadn’t anticipated it to become obvious so soon. The building had been renovated in the 1970s, so we had thought that during that builders would have fixed any major structural issues. It turned out we were wrong!

So my advice for you is: with an old building, never take anything for granted. You never know what horrors lie beneath the plaster.

Stop Press – My clever friend Yvonne, who is the Editor (and sometimes Ghost Writer) on Cotswold Eco Build, has won a major blogging award! In 2015, Yvonne started a blogging initiative as a counter to the violence occurring in our world. Her post, 1000 Voices Speak for Compassion has won a BlogHer 2016 Voices of the Year Honorees award in the Impact category.


How to Prepare for an Eco-Renovation

This is the house before any Eco Renovation
My 17th Century Cottage, before any Eco Renovation

Soon after I moved into my seventeenth century Cotswold cottage, I needed to decide what to do, how I wanted to alter the cottage. I threw around various ideas, and spoke with Sandy Hickey, the architect.

A cold and small cottage

The cottage had a living room, dining room, kitchen and four small bedrooms, one of which had a stairway off it. Up this stairway was the room I intended to use as a studio, but that soon proved impossible. As summer changed to autumn, I discovered how poorly insulated and cold that room was. I had to work in a lower room.

How-poorly-insulated and cold the cottage was
My poor cottage in the snow before the Eco Renovation

The cottage’s kitchen wasn’t very big, and before I moved in, I had thought about extending it. When I looked into the costs of what I’d planned, I began to rethink. Besides, now that I was living in the house, I realised that I liked having the patio area just outside the back door. The rest of the garden was on a higher level than the patio, and to get to it you went up some steps. It felt a bit more public, so I liked a tucked away private space near the back door. If I extended the kitchen, I would lose that lovely outdoor space.

A kitchen made of real wood

Before I made a final decision about the kitchen, I met with designers from Pineland Ltd. This kitchen company make their kitchens in real wood, which is better for the environment than the MDF particleboard used for most kitchen furniture. Pineland Ltd surprised me with the imaginative and practical layout suggestions they came up with. By utilizing the space really well, I could get almost everything I wanted into the kitchen, and not having to extend would keep costs down.

Kitchen-April-Cottage
Pineland real wood kitchen

I kept hearing from people who have done building projects that it would cost more and take longer than you expect. So I thought the best thing to do is to expect it to, then no nasty surprises.

Sandy and I had several meetings to discuss what we were going to do and how far we wanted to take this – if I wanted to gut the place and start from four walls, or if I wanted to tinker around altering a few things. I decided to take a middle ground, and do quite a lot, but not tear everything out.

Plans for my Eco Home

Sandy drew up plans detailing what type of insulation we would need in which part of the cottage. At this point I realised what a very complicated build I was embarking on. It was almost as if having an existing building was a disadvantage: the cottage has very thick outside walls, and at that stage we didn’t know if these were hollow and not very insulating, or if they were fairly solid. For all we knew, they might even have been a bit of both. There was so much we didn’t know.

Heat-Pump
Air Source Heat Pump from Ice Energy

Another thing to consider was how airtight and warm the building would be when finished – we needed to work out how much heating the building would need before we started. This is not easy to know with an old building. We decided to go for an air source heat pump to heat the hot water and the radiators. So long as a building is well insulated, this is highly efficient: for every 1kW of electricity it uses it makes 3.2kW of heat output. With the cottage being so highly insulated we would use less energy for heating the house and hot water anyway.

This would be backed up by a small wood-burning stove in the living room. It is possible that when finished, the cottage will never need the wood burning stove. However, it is much easier and cheaper to fit it during the build, than it would be to fit one afterwards if it turned out to be necessary.

Another issue concerned solar panels. There are two kinds of solar panel: thermal (which make hot water) and photo voltaic (which make electricity). Originally I planned to have both sorts, but with the solar thermal panels lots of hot water would be wasted in the summer, when there is more sun shine to produce it and just me having showers.

PV-Solar-Panels
Photo Voltaic Panels from Ikarus Ltd

It would be much more sensible to have just PV panels. There is a program in the United Kingdom where you can sell excess electricity back to the National Grid. Not only that, I can have my PV panels linked up to the highly insulated large tank of hot water, and I will be able to heat that with my own power. So I can get free hot water anyway!


Preparation Checklist for Eco Renovating Your Home

  • Decide on a budget – and be prepared for it to increase
  • Decide a realistic timescale and prepare to be flexible
  • Consider any additional extensions you may want to do and factor them in
  • Decide which renovations are essential, and which can be dropped or changed if costs or timescale increases beyond your budget
  • Consider types of heating/air conditioning, to find out which would be most suitable for your house and for your particular needs


Welcome To Cotswold Eco Build

Ist-Blog-Feature-Pic

Welcome to Cotswold Eco Build, and to my very first blog post! A few years ago, I bought a cottage in a Cotswold village, with the plan to make it as eco as possible. As this project got bigger, more and more people became interested in what I was doing. I decided to keep a record of my build – and so this blog was born.

Lots of people ask about how much it is possible to do to an existing building to make it much more energy efficient. Many are also keen to learn what can be done in their own homes to make them more eco. I’ll do my best to answer those questions throughout this blog. I haven’t got everything right, but my mistakes can be your guide – you can learn what to do and also what not to do!
Ist-Blog-6-PicIt all began while I was living and working in London, getting tired of living in a crowded city. I also had  a growing interest in all things eco. I was aware of all kinds of building techniques, such as strawbale and earthships, that were able to produce buildings that needed no source of heating whatsoever! Now that is truly eco!

At first I wondered what I could do to eco up my city flat. Compared to a lot of buildings mine had a lot going for it; it was a big old terraced Victorian building, separated into flats. I had noticed that when it began to get cold outside in the winter, I didn’t need the heating on at first. The terrace of houses kept each other warm.

However, I wanted to go further with creating an environmentally friendly home and decided to move. It was quite a challenge to find the right house, and at a price that was affordable.

It turns out London is the third most expensive place in the world to buy a property, behind only Hong Kong and Monaco. You’ll notice this blog isn’t called London Eco Build, but Cotswold Eco Build – and yes, moving to the country. So adjusting to that is another challenge I faced.

Ist-Blog-1-PicWhen we were in the planning stages, the architect and builder told me that the best thing was for me to move out of the house (yes, I was living in it in this dilapidated condition). With me out, they could gut the place and then make a plan from there – that was scary!

Right now my house has had its insides ripped out, and is all ready to go back together again. But airtight and thermally efficient. (I am learning a lot of new words on this journey, like thermally efficient).

Ist-Blog-2-Pic

It’s hard to believe, looking back at these photos, just how terrible the house was. Before we started I was living in it like that!

Ist-Blog-4-Pic
I hope you’ll feel as excited as I do about this project. We will move through the stages of what is happening on my building site. Also look at linked subjects that will interest you – like amazing eco builds I have visited. We used some astonishing products to rebuild my shell of a house!

I plan to publish a post filled with useful information every two weeks. The next post will explain how to buy a suitable house for Eco Renovation. But you don’t have to wait that long – if you subscribe to receive updates you will get a cool free PDF booklet packed with tips for you to easily make your home more eco right now, whilst also saving you money!

I’d love to hear from you. If you have any questions about my build or about Eco homes, let me know in the comments. I’ll do my best to answer them in future posts. Meantime, do please sign up for this free PDF packed with Eco-tips for your home.

Free-Gift-Cover-Eco-Tips